


 |
| Standalone Arduino On Breadboard |
 |
| Setting Up an Arduino On Breadboard |
- Can Arduino on Breadboard?
- Why to burn Bootloader?
- Making it Standalone.
- Uploading ArduinoISP.
- Burning Bootloader on the Microcontroller.
- Uploading the Sketch.
- Worked Images and video.
1. Can Arduino on Breadboard?
Generally an Arduino board will have a Microcontroller and it is generally referred as physically programmable electronic circuit board. The programming of this board can be done on the Arduino software which is in general an open-source IDE(Integrated Development Environment) that runs on any computer. Since,the Arduino is open-source which makes the hardware to be available at reasonable price and the development software is freely available at the official Arduino site to download. Arduino can be used for developing projects because it has the capability of sensing through sensors,run the stepper motors,take inputs and process it through programs etc.,
The Arduino board has the built-in power supply mode, a crystal oscillator for producing the clock signals, ICSP pins for uploading the code etc., which makes the Microcontroller to work in Standalone mode. There is a possibility of making the Microcontroller built-on Breadboard which works similar to the Arduino. This Microcontroller built-on Breadboard can be also called as Arduino on Breadboard. This Arduino on Breadboard can be operated in two different modes i.e., either in Minimal mode or Maximal(Standalone) mode. The Process that to be undertaken for making the Microcontroller built-on Breadboard to work similar to arduino are
- Bootload the Microcontroller,to make it work with Arduino IDE
- Uploading the sketch to the Microcontroller.
2. Why to Burn Bootloader?
A Microcontroller is commonly programmed through a specified programmer and follows several protocols for writing to their ROM's. This becomes Hectic and Tedious Job. The other way to program a Microcontroller, is to write a special program into its flash memory. This special program is called Bootloader which is used to burn the Firmware to the Microcontroller. The Bootloader resides in the small section of the ROM in the microcontroller and its starting address is located at the beginning or bottom of the ROM. It is generally executed first whenever initialized. It is sufficient to Burn Bootloader of the microcontroller once. For making the Microcontroller/Arduino board to work as expected and also to understand the Arduino IDE we load a special program called as "Arduino Bootloader".
Burning the Arduino Bootloader can be done in four ways:
Burning the Arduino Bootloader can be done in four ways:
- Through an AVR-ISP(in-system programmer).

- Through an USBtinyISP.

- By building a Parallelprogrammer.

- Using Arduino as an AVR-ISP.


3. Making it Standalone:
REQUIREMENTS:

7. Worked Images and video:
REQUIREMENTS:
- ATMEGA 328P CHIP(Microcontroller)

- 16 MHz Crystal Oscillator

- Resistor - 10K Ohm.

- Capacitor - 22pF(two) & 100nF(one).


- Push Button.
 STANDALONE ARRANGEMENTS ON BREADBOARD:


STEPS TAKEN ARE:
- 10K Ohm resistor from Pin1 to GND.
- Push Button fron Pin1 to GND.
- 16MHz Crystal Oscillator between Pin9 and Pin10.
- 22pF Capacitor from Pin9 to GND.
- 22pF Capacitor from Pin10 to GND.
- Pin7 to +5V & Pin8 to GND.
- Pin20&Pin21 to +5V & Pin22 to GND.
4. Uploading ArduinoISP:
Arduino Board here used can be of any type. In this article we prefer to use Arduino Mega 2560.
5. Burning Bootloader on the Microcontroller:
6. Uploading the sketch:Arduino Board here used can be of any type. In this article we prefer to use Arduino Mega 2560.
Follow these steps for uploading ArduinoISP sketch:
- Open Arduino IDE.
- Connect Arduino MEGA 2560 to PC.
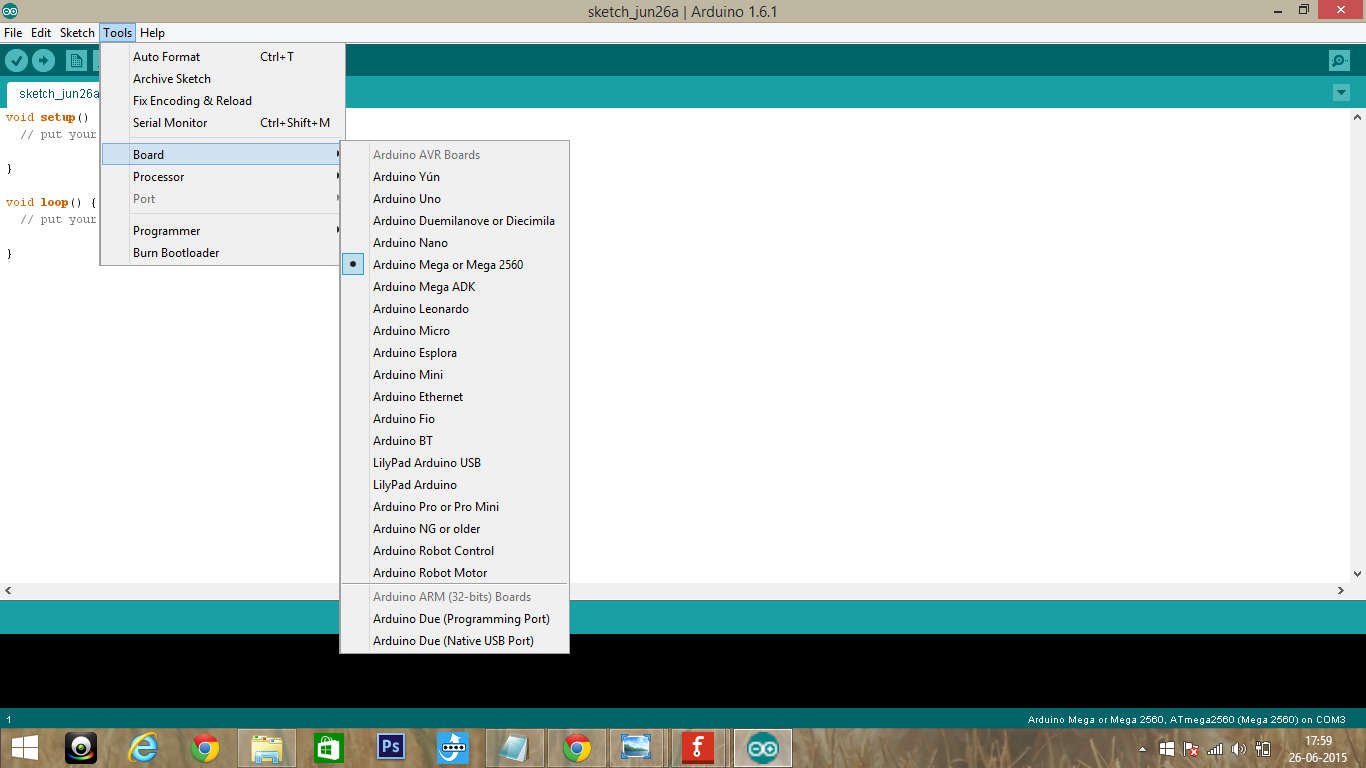
- GoTo => Tools => Board => MEGA 2560(if any select here).

- Set Communication PORT. GoTo Tools => PORT => (select here).

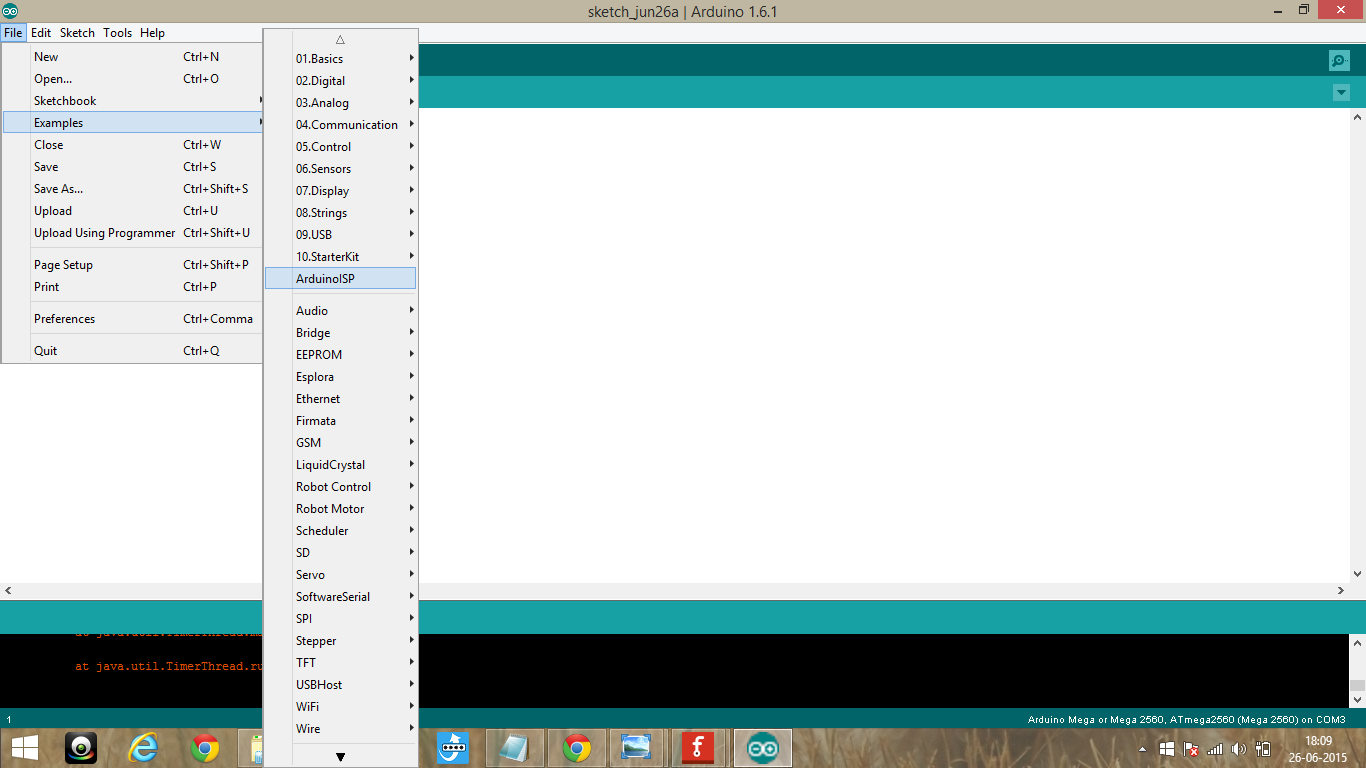
- Get ArduinoISP sketch from examples. GoTo File => examples => ArduinoISP

- Now Upload the ArduinoISP sketch to the Board(that you have).


5. Burning Bootloader on the Microcontroller:
- Before entering to Burn Bootloader, disable the autoreset in the Board which you will use as ISP by placing a 100nF Capacitor between RESET Pin and GND.

- GoTo Tools => Board => Arduino Nano or Arduino Due(select).

- GoTo Tools => Processor => Atmega 328(or 168).

- Check the serial Communication port, GoTo Tools => Port => (select your Port).

- GoTo Tools => Programmer => Arduino as ISP(set this to make your Board act as ISP Progrmmer).

- Finally, recheck the connections, now GoTo Tools => Burn Bootloader.(Burning bootloader once is enough for a new chip). This may take a minute.


- Open the sketch and compile it (Here is the sample sketch used below).

- Now, GoTo File => Upload Using Programmer.


7. Worked Images and video:
- Arduino(Microcontroller) on Breadboard.

- Set up before Burning Bootloader.

- Working of Arduino on Breadboard video.


0 comments:
Post a Comment